2011年12月20日火曜日

OpenID Connectについて勉強する

①OpenID Connectとは
OpenID Connectは、OAuth2.0仕様をベースとした認証連携用のプロトコルであり、レストフルなAPIを介して認証情報を交換するフレームワークを提供する。
クライアントにおいては、すべての種類(ブラウザ、携帯端末、javascriptなど)に対応し、認証連携が可能である。
オプション的に、認証情報の暗号化、OPのディスバリ、セッション管理(ログアウトを含む)をサポートしていている。

②OpenID 2.0との違い
OpenID Connectを使用すれば、OpenID2.0と同等のことが可能であるが、APIがよりfriendlyである。また、OpenID Connectは、署名/暗号化に関して、よりロバストなメカニズムを提供している。
一番の違いは、プロトコルでOAuth2.0仕様を取り入れていることにある。


③OpenID Connectの規約
OpenID Connectでは、大きく分けて以下の6つの仕様を規定する。

  • Basic Client Profile - Webサービス(RP)がOPと認証連携する際のプロトコルを規定する。
  • Discovery – (オプション) OPのエンドポイントを検索する際のプロトコルを規定する。
  • Dynamic Registration – (オプション) 動的にOPにRPを登録するプロトコルを規定する。
  • Standard – RP、OPとユーザ間のHTTPバインディング仕様を規定する。
  • Messages – OpenID Connectで使用するメッセージの規約を規定する。
  • Session Management – (オプション) セッション管理の仕様を規定する。


2011年12月16日金曜日

OAuth2.0 プロトコルを理解する

http://memoyasu.blogspot.com/2011/12/oauth20-facebook.html」で作成したサンプルアプリを使用し、OAuth2.0のプロトコルの中身をみてみる。


①ユーザがブラウザを使用してサンプルアプリにアクセスする。

②サンプルアプリからFacebookに認可要求する。
------------------------------------------------------------
Started GET "/client/oauth" for 127.0.0.1 at 2011-12-15 23:29:57 +0900
  Processing by ClientController#oauth as HTML
Redirected to https://graph.facebook.com/oauth/authorize?response_type=code&clie
nt_id=*************&redirect_uri=http%3A%2F%2Fopenam.yasuyasu.com%3A3001%2Fcli
ent%2Fcallback&scope=offline_access%2Cpublish_stream
------------------------------------------------------------
★reponse_typeでは、認可コードを返すように要求する。
★client_idには、Facebookに登録した際に作成されたクライアントアプリのIDを指定する。
★redirect_uriでは、戻り先URLを指定する。

③ユーザがブラウザを使用してFacebookとクレデンシャル情報をやりとりする。また、サンプルアプリに対してサービス利用を許可するかを認可する。

④Facebookがサンプルアプリに認可コードを返す。
------------------------------------------------------------
Started GET "/client/callback?code=AQDp......."
for 127.0.0.1 at 2011-12-15 23:29:58 +0900
------------------------------------------------------------

⑤サンプルアプリはFacebookに対して認可コードに基づき、アクセストークンを要求(POST)する。
------------------------------------------------------------
{"grant_type"=>"authorization_code", "code"=>"AQBaL_ue......", "client_id"=>"****", "client_secret"=>"****", :redirect_uri=>"http://openam.yasuyasu.com:3001/client/callback"}
------------------------------------------------------------
★codeには、Facebookから取得した認可コードを指定する。
★client_idには、Facebookに登録した際に作成されたクライアントアプリのIDを指定する。
★client_secretには、Facebookに登録した際に作成されたクライアントアプリのパスワードを指定する。
★redirect_uriでは、戻り先URLを指定する。

⑥Facebookは、サンプルアプリにアクセストークンを返す。
------------------------------------------------------------
access_token=AAAE.......
------------------------------------------------------------

⑦アンプルアプリは、Facebookに対して、アクセストークンに基づきサービスを要求(GET)する。
------------------------------------------------------------
https://graph.facebook.com/me?access_token=AAAE.......
------------------------------------------------------------

⑧Facebookはアクセストークンを検証し、OKであれば、サンプルアプリにサービス情報を返す。
------------------------------------------------------------
{\"id\":\"10..............\",\"name\":\"**********\",.............}
------------------------------------------------------------

2011年12月13日火曜日

OAuth2.0 Facebookと連携してみる

OAuth2.0を使用して、Facebookと連携するrailsアプリを作成する。
なお、クライアントのサンプルアプリでは、Facebookが公開しているOAuth2.0用ライブラリを使用する(実は、Facebookのライブラリでは、OAuth2.0ライブラリを呼び出している)。

①以下のサイトにアクセスし、アプリを登録する。
https://developers.facebook.com/apps
Client IDとClient secretが作成される。


②gemコマンドを使用し、Facebookが公開しているOAuth2.0ライブラリをインストールする。

C:\Users\yasu\clientapp\facebook>gem install facebook_oauth
Fetching: facebook_oauth-0.3.0.gem (100%)
Successfully installed facebook_oauth-0.3.0
1 gem installed
Installing ri documentation for facebook_oauth-0.3.0...
Installing RDoc documentation for facebook_oauth-0.3.0...


③railsのサンプルアプリケーションを作成する。
c:\Users\yasu\clientapp>rails new facebook
       exist
      create  README
      create  Rakefile
      create  config.ru
      create  .gitignore
      create  Gemfile
      create  app
      create  app/assets/images/rails.png
      create  app/assets/javascripts/application.js
      create  app/assets/stylesheets/application.css
      create  app/controllers/application_controller.rb
      create  app/helpers/application_helper.rb
      create  app/mailers
      create  app/models
      create  app/views/layouts/application.html.erb
      create  app/mailers/.gitkeep
      create  app/models/.gitkeep
      create  config
      create  config/routes.rb
      create  config/application.rb
      create  config/environment.rb
      create  config/environments
      create  config/environments/development.rb
      create  config/environments/production.rb
      create  config/environments/test.rb
      create  config/initializers
      create  config/initializers/backtrace_silencers.rb
      create  config/initializers/inflections.rb
      create  config/initializers/mime_types.rb
      create  config/initializers/secret_token.rb
      create  config/initializers/session_store.rb
      create  config/initializers/wrap_parameters.rb
      create  config/locales
      create  config/locales/en.yml
      create  config/boot.rb
      create  config/database.yml
      create  db
      create  db/seeds.rb
      create  doc
      create  doc/README_FOR_APP
      create  lib
      create  lib/tasks
      create  lib/tasks/.gitkeep
      create  lib/assets
      create  lib/assets/.gitkeep
      create  log
      create  log/.gitkeep
      create  public
      create  public/404.html
      create  public/422.html
      create  public/500.html
      create  public/favicon.ico
      create  public/index.html
      create  public/robots.txt
      create  script
      create  script/rails
      create  test/fixtures
      create  test/fixtures/.gitkeep
      create  test/functional
      create  test/functional/.gitkeep
      create  test/integration
      create  test/integration/.gitkeep
      create  test/unit
      create  test/unit/.gitkeep
      create  test/performance/browsing_test.rb
      create  test/test_helper.rb
      create  tmp/cache
      create  tmp/cache/assets
      create  vendor/assets/stylesheets
      create  vendor/assets/stylesheets/.gitkeep
      create  vendor/plugins
      create  vendor/plugins/.gitkeep
         run  bundle install
Fetching source index for http://rubygems.org/
Using rake (0.9.2.2)
Using multi_json (1.0.4)
Using activesupport (3.1.2)
Using builder (3.0.0)
Using i18n (0.6.0)
Using activemodel (3.1.2)
Using erubis (2.7.0)
Using rack (1.3.5)
Using rack-cache (1.1)
Using rack-mount (0.8.3)
Using rack-test (0.6.1)
Using hike (1.2.1)
Using tilt (1.3.3)
Using sprockets (2.1.2)
Using actionpack (3.1.2)
Using mime-types (1.17.2)
Using polyglot (0.3.3)
Using treetop (1.4.10)
Using mail (2.3.0)
Using actionmailer (3.1.2)
Using arel (2.2.1)
Using tzinfo (0.3.31)
Using activerecord (3.1.2)
Using activeresource (3.1.2)
Using ansi (1.4.1)
Using bundler (1.0.21)
Using coffee-script-source (1.1.3)
Installing execjs (1.2.11)
Using coffee-script (2.2.0)
Using rack-ssl (1.3.2)
Using json (1.6.3)
Using rdoc (3.11)
Using thor (0.14.6)
Using railties (3.1.2)
Using coffee-rails (3.1.1)
Using jquery-rails (1.0.19)
Using rails (3.1.2)
Using sass (3.1.11)
Using sass-rails (3.1.5)
Installing sqlite3 (1.3.5)
Using turn (0.8.3)
Using uglifier (1.1.0)
Your bundle is complete! Use `bundle show [gemname]` to see where a bundled gem
is installed.
c:\Users\yasu\clientapp>cd facebook
c:\Users\yasu\clientapp\facebook>rails generate controller Client index callback
      create  app/controllers/client_controller.rb
       route  get "client/callback"
       route  get "client/index"
      invoke  erb
      create    app/views/client
      create    app/views/client/index.html.erb
      create    app/views/client/callback.html.erb
      invoke  test_unit
      create    test/functional/client_controller_test.rb
      invoke  helper
      create    app/helpers/client_helper.rb
      invoke    test_unit
      create      test/unit/helpers/client_helper_test.rb
      invoke  assets
      invoke    coffee
      create      app/assets/javascripts/client.js.coffee
      invoke    scss
      create      app/assets/stylesheets/client.css.scss

④client_controller.rb(C:\Users\yasu\clientapp\facebook\app\controllers配下)を修正する。
----------------------------------------------------------
require "oauth2"
require 'facebook_oauth'
class ClientController < ApplicationController

  # コールバック先URL
  CALLBACK_URL    = "http://openam.yasuyasu.com:3001/client/callback"
  # CONSUMER KEY
  CONSUMER_KEY    = "id" ←★Client IDを設定
  # CONSUMER SECRET
  CONSUMER_SECRET = "secret" ←★Client secretを設定

  # サンプルアプリがFacebookからアクセストークンを取得する際、
  # クライアント側でサーバ証明書を検証する(デフォルトの設定)。
  # (よくない対応だが、)ここではサーバ証明書を検証しないようにする。
  OpenSSL::SSL::VERIFY_PEER = OpenSSL::SSL::VERIFY_NONE

  def index
  end

  def oauth
    client = FacebookOAuth::Client.new(
      :application_id     => CONSUMER_KEY,
      :application_secret => CONSUMER_SECRET,
      :callback           => CALLBACK_URL
    )
    # 認可コードの要求
    redirect_to client.authorize_url
  end

  def callback
    @client = FacebookOAuth::Client.new(
      :application_id     => CONSUMER_KEY,
      :application_secret => CONSUMER_SECRET,
      :callback           => CALLBACK_URL
    )
    # アクセストークンの取得
    @client.authorize(:code => params[:code])
  end
end
----------------------------------------------------------

⑤index.html.erb(C:\Users\yasu\clientapp\facebook\app\views\client配下)を修正する。以下を追加する。
<%= link_to 'OAuth', '/client/oauth' %>

⑥callback.html.erb(C:\Users\yasu\clientapp\facebook\app\views\client配下)を修正する。以下を追加する。
<%= @client.me.info %>

WEBrickを起動する。

C:\Users\yasu\clientapp\facebook>rails  server -p 3001
=> Booting WEBrick
=> Rails 3.1.2 application starting in development on http://0.0.0.0:3001
=> Call with -d to detach
=> Ctrl-C to shutdown server
[2011-12-12 23:02:08] INFO  WEBrick 1.3.1
[2011-12-12 23:02:08] INFO  ruby 1.9.3 (2011-10-30) [i386-mingw32]
[2011-12-12 23:02:08] INFO  WEBrick::HTTPServer#start: pid=6300 port=3001


 ブラウザで「http://openam.yasuyasu.com:3001/client/index」にアクセスする。Facebook側でサンプルアプリと連携してよいかを確認されるため、認可する。
以下の画面が表示されれば連携が完了である。


2011年12月8日木曜日

OAuth2.0について勉強する

以下のURLが、OAuth1.0との違いを述べられていて理解しやすかった。
http://www.atmarkit.co.jp/fsmart/articles/oauth2/02.html

【図の抜粋】


上記のシーケンスを見ても分かるとおり、OAuth2.0は1.0と比較して以下の違いがある。
●リクエストトークンがまるごとなくなった。かわりに、認可コードを使用して、アクセストークンを取得している。
●OAuth1.0では、リクエストトークン、アクセストークンの取得時には必ず署名しなければならない仕様だった。OAuth2.0では、HTTPS通信を必須にすることで、署名しなくてよくなった(改ざんを防ぐことができる)。

<感想>
OAuth2.0は、SAML2.0で規定するWebブラウザSSOプロファイル(Artifactバインディング)に非常によく似たシーケンスである(認可コード=Artifact、アクセストークン=SAMLアサーションのようなイメージ)。
SAMLの認可アサーションも、他のWebサービスに伝播させれば、アクセストークンみたいな使い方ができると思う。ただし、SAMLはXMLベースなので、やっぱり軽量なのは、OAuth2.0だと考える。

2011年12月5日月曜日

OAuth1.0 Twitterと連携してみる

サンプルアプリ(Consumer)とTwitter(Service Provider)をOAuth1.0で連携させ、Twitterのつぶやきをアプリで表示してみる。

①gemコマンドを使用し、oauthをインストールする。
c:\>gem install oauth
Fetching: oauth-0.4.5.gem (100%)
Successfully installed oauth-0.4.5
1 gem installed
Installing ri documentation for oauth-0.4.5...
Installing RDoc documentation for oauth-0.4.5...


②Twitterの以下のOAuthページにサンプルアプリケーション(Consumer)を登録する。登録した後、Consumer keyとConsumer sercretが作成される。
https://dev.twitter.com/apps

③Railsアプリケーションを作成する。
C:\Users\yasu\clientapp>rails new twitoauth
      create
      create  README
      create  Rakefile
      create  config.ru
      create  .gitignore
      create  Gemfile
      create  app
      create  app/assets/images/rails.png
      create  app/assets/javascripts/application.js
      create  app/assets/stylesheets/application.css
      create  app/controllers/application_controller.rb
      create  app/helpers/application_helper.rb
      create  app/mailers
      create  app/models
      create  app/views/layouts/application.html.erb
      create  app/mailers/.gitkeep
      create  app/models/.gitkeep
      create  config
      create  config/routes.rb
      create  config/application.rb
      create  config/environment.rb
      create  config/environments
      create  config/environments/development.rb
      create  config/environments/production.rb
      create  config/environments/test.rb
      create  config/initializers
      create  config/initializers/backtrace_silencers.rb
      create  config/initializers/inflections.rb
      create  config/initializers/mime_types.rb
      create  config/initializers/secret_token.rb
      create  config/initializers/session_store.rb
      create  config/initializers/wrap_parameters.rb
      create  config/locales
      create  config/locales/en.yml
      create  config/boot.rb
      create  config/database.yml
      create  db
      create  db/seeds.rb
      create  doc
      create  doc/README_FOR_APP
      create  lib
      create  lib/tasks
      create  lib/tasks/.gitkeep
      create  lib/assets
      create  lib/assets/.gitkeep
      create  log
      create  log/.gitkeep
      create  public
      create  public/404.html
      create  public/422.html
      create  public/500.html
      create  public/favicon.ico
      create  public/index.html
      create  public/robots.txt
      create  script
      create  script/rails
      create  test/fixtures
      create  test/fixtures/.gitkeep
      create  test/functional
      create  test/functional/.gitkeep
      create  test/integration
      create  test/integration/.gitkeep
      create  test/unit
      create  test/unit/.gitkeep
      create  test/performance/browsing_test.rb
      create  test/test_helper.rb
      create  tmp/cache
      create  tmp/cache/assets
      create  vendor/assets/stylesheets
      create  vendor/assets/stylesheets/.gitkeep
      create  vendor/plugins
      create  vendor/plugins/.gitkeep
         run  bundle install
Fetching source index for http://rubygems.org/
Installing rake (0.9.2.2)
Installing multi_json (1.0.4)
Using activesupport (3.1.2)
Using builder (3.0.0)
Using i18n (0.6.0)
Using activemodel (3.1.2)
Using erubis (2.7.0)
Using rack (1.3.5)
Using rack-cache (1.1)
Using rack-mount (0.8.3)
Using rack-test (0.6.1)
Using hike (1.2.1)
Using tilt (1.3.3)
Installing sprockets (2.1.2)
Using actionpack (3.1.2)
Using mime-types (1.17.2)
Using polyglot (0.3.3)
Using treetop (1.4.10)
Using mail (2.3.0)
Using actionmailer (3.1.2)
Using arel (2.2.1)
Using tzinfo (0.3.31)
Using activerecord (3.1.2)
Using activeresource (3.1.2)
Installing ansi (1.4.1)
Using bundler (1.0.21)
Installing coffee-script-source (1.1.3)
Installing execjs (1.2.9)
Installing coffee-script (2.2.0)
Using rack-ssl (1.3.2)
Installing json (1.6.3) with native extensions
Using rdoc (3.11)
Using thor (0.14.6)
Using railties (3.1.2)
Installing coffee-rails (3.1.1)
Installing jquery-rails (1.0.19)
Using rails (3.1.2)
Installing sass (3.1.11)
Installing sass-rails (3.1.5)
Using sqlite3 (1.3.4)
Installing turn (0.8.3)
Installing uglifier (1.1.0)
Your bundle is complete! Use `bundle show [gemname]` to see where a bundled gem
is installed.
C:\Users\yasu\clientapp>cd twitoauth

C:\Users\yasu\clientapp\twitoauth>rails generate controller index
      create  app/controllers/index_controller.rb
      invoke  erb
      create    app/views/index
      invoke  test_unit
      create    test/functional/index_controller_test.rb
      invoke  helper
      create    app/helpers/index_helper.rb
      invoke    test_unit
      create      test/unit/helpers/index_helper_test.rb
      invoke  assets
      invoke    coffee
      create      app/assets/javascripts/index.js.coffee
      invoke    scss
      create      app/assets/stylesheets/index.css.scss


④C:\Users\yasu\clientapp\twitoauth\app\controllers\IndexController.rbを修正し、IndexContollerクラスを作成する。
--------------------------------------------------------

require 'json'
require "oauth"

class IndexController < ApplicationController
  def self.consumer
    OAuth::Consumer.new(

      "Consumer key", ←★Twitter画面で表示されたConsumer Keyを設定。
      "Consumer secret", ←★Twitter画面で表示されたConsumer secretを設定。

      { :site => "http://twitter.com" }
    )
  end

  def index
  end

  def oauth

    # 未認可のRequestTokenの取得
    request_token = IndexController.consumer.get_request_token(
      :oauth_callback => "http://#{request.host_with_port}/oauth_callback"
    )
    session[:request_token] = request_token.token
    session[:request_token_secret] = request_token.secret

    # RequestTokenの認可要求
    redirect_to request_token.authorize_url
    return
  end

  def oauth_callback
    consumer = IndexController.consumer
    # 認可済みRequestTokenの取得
    request_token = OAuth::RequestToken.new(
      consumer,
      session[:request_token],
      session[:request_token_secret]
    )

    # AccessTokenの取得
    access_token = request_token.get_access_token(
      {},
      :oauth_token => params[:oauth_token],
      :oauth_verifier => params[:oauth_verifier]
    )

    # AccessTokenをもとに、ServiceProviderサービスを呼び出す
    response = consumer.request(
      :get,
      '/account/verify_credentials.json',
      access_token, { :scheme => :query_string }
    )
    case response
    when Net::HTTPSuccess
      @user_info = JSON.parse(response.body)
      unless @user_info['screen_name']
        flash[:notice] = "Authentication failed"
        redirect_to :action => :index
        return
      end
    else
      RAILS_DEFAULT_LOGGER.error "Failed to get user info via OAuth"
      flash[:notice] = "Authentication failed"
      redirect_to :action => :index
      return
    end
  end
end

----------------------------------------

⑤indexアクションに対応するviewを作成する(C:\Users\yasu\clientapp\twitoauth\app\views\index\index.erbを作成)。

<html>
<head>
<meta http-equiv="content-type" content="text/html; charset=utf-8" />
<title>OAuth Sample App</title>
</head>
<body>
<a href="/oauth">Authentication at Twitter</a>
</body>
</html>


⑥indexアクションとURLをマッピングする。C:\Users\yasu\clientapp\twitoauth\config\routes.rbに以下を追加する。
----------------------------------
   get "oauthclient" => "index#index"
   get "oauth"       => "index"
   get "oauth_callback" => "index"
----------------------------------

c:\Users\yasu\clientapp\twitoauth>rake routes
   oauthclient GET /oauthclient(.:format)    {:action=>"index", :controller=>"index"}
         oauth GET /oauth(.:format)          {:action=>"oauth", :controller=>"index"}
oauth_callback GET /oauth_callback(.:format) {:action=>"oauth_callback", :controller=>"index"}

⑦Service Provider(Twitter)からAccess Tokenを取得した後のConsumerの戻り先erbを作成する。
(C:\Users\yasu\clientapp\twitoauth\app\views\index\oauth_callback.erb)
<html>
<head>
<meta http-equiv="content-type" content="text/html; charset=utf-8" />
<title>Access succeed!</title>
</head>
<body>
<h1><%= @user_info['name'] %> 's tubuyaki</h1>
<%= @user_info['status']['text'] %>
</body>
</html>

⑧WEBrickを起動する。
C:\Users\yasu\clientapp\twitoauth>rails server -p 3001
=> Booting WEBrick
=> Rails 3.1.2 application starting in development on http://0.0.0.0:3001
=> Call with -d to detach
=> Ctrl-C to shutdown server
[2011-12-02 23:58:49] INFO  WEBrick 1.3.1
[2011-12-02 23:58:52] INFO  ruby 1.9.3 (2011-10-30) [i386-mingw32]
[2011-12-02 23:58:52] INFO  WEBrick::HTTPServer#start: pid=8656 port=3001

⑨「http://openam.yasuyasu.com:3001/oauthclient」にアクセスし、以下の画面が表示されることを確認する。


また、「連携アプリを認証」ボタンを押下した後、最新のつぶやきが表示されることを確認する。


2011年11月30日水曜日

OAuth1.0のプロトコルを勉強する

OAuth1.0の流れは以下になる。
登場人物として、User(ユーザ)、Consumer、Service Providerの3つがある。
ConumserとService Providerは、事前に信頼関係を構築する必要がある(OpenID仕様みたいに、だれとでも認証連携できるものではない)。

【アクセス権限の設定1】
①ユーザ(ブラウザを使用)は、Consumerに対してサービスを要求する。
②ConsumerのWebsiteでは、Service Providerに対して未認可のRequest Tokenを要求する。Service Providerは、未認可のRequest Tokenを作成し、Consumerに返す。
③Consumerは、Service Providerにユーザをリダイレクトさせる。このとき、未認可のRequest Tokenを送付する。

【アクセス権限の設定2】
①ユーザは、Service Providerと認証する。このとき、未認可のRequest Tokenも送付する。
②ユーザは、Consumerに対し、Service Providerで管理するサービスへのアクセス権限を与える。
③Service Providerは、ユーザをConsumerにリダイレクトさせる。このとき、認可済みRequest Tokenも送付する。

【アクセス権限の委譲】
①ユーザは、Service ProviderからConsumerにリダイレクトされる。
②Consumerは、Service Providerに対して、認可済みRequest TokenをもとにAccess Tokenを要求する。
③Service Providerは、ユーザがConsumerに対してアクセス権限を委譲したかをチェックし、Access Tokenを返す。このとき、Request TokenがAccess Tokenになる。
④Consumerは、Access Tokenを使用してService Providerに対してサービスを要求する。

■未認可のRequest Tokenの内容
(1)リクエスト
Parameter Name Description 
oauth_consumer_keyService Providerにおいて、Consumerと信頼関係を結ぶ際に生成されるConsumerの一意な識別子。
oauth_signature_methodConsumerがRequest Token(リクエスト)を署名する際に使用する署名アルゴリズム。すべてのRequest Token(リクエスト)は、Consumerによって署名され、Service Providerによって署名検証されなけらばならない。OAuthでは以下の署名アルゴリズムをサポートしている。
 HMAC-SHA1, RSA-SHA1, and PLAINTEXT.
oauth_signature上記の署名アルゴリズムによって作成された署名データ。Service ProviderがRequest Token(リクエスト)を検証するために使用する。
oauth_timestampRequest Token(リクエスト)のタイムスタンプ。
oauth_nonceConsumerが作成した一意なランダム文字列。リプライ攻撃を防ぐために使用される。
oauth_versionOAuth 仕様のバージョン(オプション)。
(2)レスポンス
Parameter Name Description 
oauth_tokenRequest Tokenのデータ。
oauth_token_secretConsumerがRequest Tokenを検証するために使用する秘密情報。

■認可済みRequest Tokenの内容
Parameter Name Description 
oauth_token認可済みRequest Tokenのデータ。
oauth_callbackユーザがアクセス権限を委譲した後にリダイレクトされるConsumerのURL。

■Access Tokenの内容
(1)リクエスト
Parameter Name Description 
oauth_consumer_keyService Providerにおいて、Consumerと信頼関係を結ぶ際に生成されるConsumerの一意な識別子。
oauth_tokenRequest Tokenのデータ。
oauth_signature_methodConsumerがRequest Token(リクエスト)を署名する際に使用する署名アルゴリズム。すべてのAccess Token(リクエスト)は、Consumerによって署名され、Service Providerによって署名検証されなけらばならない。OAuthでは以下の署名アルゴリズムをサポートしている。
 HMAC-SHA1, RSA-SHA1, and PLAINTEXT.
oauth_signature上記の署名アルゴリズムによって作成された署名データ。Service ProviderがRequest Token(リクエスト)を検証するために使用する。
oauth_timestampAccess Token(リクエスト)のタイムスタンプ。
oauth_nonceConsumerが作成した一意なランダム文字列。リプライ攻撃を防ぐために使用される。
oauth_version OAuth 仕様のバージョン(オプション)。
(2)レスポンス
Parameter Name Description 
oauth_tokenAccess Tokenのデータ。 
oauth_token_secretConsumerがAccess Tokenを検証するために使用する秘密情報。 

2011年11月29日火曜日

OpenAM 9.5  構築手順

OpenAM9.5の構築手順について説明する。
なお、アプリケーションサーバはGlassfish2.1.1を使用する。

①以下のサイトからGlassfishのインストール媒体(glassfish-installer-v2.1.1-windows.jar )をダウンロードし、インストールする。
http://glassfish.java.net/downloads/v2.1.1-final.html

②Glassfishのドメイン(ポート28080)を作成する。
C:\glassfish\glassfish\bin>asadmin  create-domain  --adminport 24848 --instancep
ort 28080  --savemasterpassword=true --savelogin=true openiddomain
Please enter the admin user name>admin
Please enter the admin password>
Please enter the admin password again>
Please enter the master password [Enter to accept the default]:>
Please enter the master password again [Enter to accept the default]:>
Using port 24848 for Admin.
Using port 28080 for HTTP Instance.
Default port 7676 for JMS is in use. Using 58525
Default port 3700 for IIOP is in use. Using 58526
Default port 8181 for HTTP_SSL is in use. Using 58527
Using default port 3820 for IIOP_SSL.
Using default port 3920 for IIOP_MUTUALAUTH.
Default port 8686 for JMX_ADMIN is in use. Using 58528
Domain being created with profile:developer, as specified by variable AS_ADMIN_P
ROFILE in configuration file.
------ Using Profile [developer] to create the domain ------
XML processing for profile: Base document [C:\glassfish\glassfish\lib\install\te
mplates\default-domain.xml.template]. Profile name [developer]. Processing prope
rty [domain.xml.style-sheets].

The file in given locale [ja_JP] at: [C:\glassfish\glassfish\lib\install\templat
es\locales\ja_JP\index.html] could not be found. Using default (en_US) index.htm
l instead.
Security Store uses: JKS
Domain openiddomain created.
Admin login information for host [localhost] and port [24848] is being overwritt
en with credentials provided. This is because the --savelogin option was used du
ring create-domain command.
Login information relevant to admin user name [admin] for this domain [openiddom
ain] stored at [C:\Users\yasu\Downloads\.asadminpass] successfully.
Make sure that this file remains protected. Information stored in this file will
 be used by asadmin commands to manage this domain.

③作成したドメインを起動する。
C:\glassfish\glassfish\bin>asadmin  start-domain openiddomain
Starting Domain openiddomain, please wait.
Default Log location is C:\glassfish\glassfish\domains\openiddomain\logs\server.
log.
Redirecting output to C:/glassfish/glassfish/domains/openiddomain/logs/server.lo
g
Domain openiddomain is ready to receive client requests. Additional services are
 being started in background.
Domain [openiddomain] is running [Sun GlassFish Enterprise Server v2.1.1 ((v2.1
Patch06)(9.1_02 Patch12)) (build b31g-fcs)] with its configuration and logs at:
[C:\glassfish\glassfish\domains].
Admin Console is available at [http://localhost:24848].
Use the same port [24848] for "asadmin" commands.
User web applications are available at these URLs:
[http://localhost:28080 https://localhost:58527 ].
Following web-contexts are available:
[/web1  /__wstx-services ].
Standard JMX Clients (like JConsole) can connect to JMXServiceURL:
[service:jmx:rmi:///jndi/rmi://yasu-PC:58528/jmxrmi] for domain management purpo
ses.
Domain listens on at least following ports for connections:
[28080 58527 24848 58526 3820 3920 58528 ].
Domain does not support application server clusters and other standalone instanc
es.

④「http://localhost:28080/」にアクセスできることを確認する。

④以下のサイトからOpenAMのインストール媒体(openam_953.war)をダウンロードする。
http://www.forgerock.org/openam.html

⑤「openam_953.war」を「openam.war」に変名する。以下にwarを配備する。
C:\glassfish\glassfish\domains\openiddomain\autodeploy

⑥「http://openam.yasuyasu.com:28080/openam/config/options.htm」にアクセスする。「設定オプション」画面が表示されるため、「カスタム設定」を選択する。

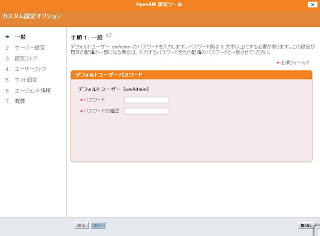
⑦OpenAMの管理ユーザamAdminのパスワードを入力し、「次へ」を押下する。
⑧サーバ情報を入力し、「次へ」を押下する。

⑨「設定データストア」画面が表示される。OpenAMにバンドルされているOpenDSを使用するため、そのまま「次へ」を押下する。
⑩「ユーザデータストア設定」画面が表示される。OpenAMにバンドルされているOpenDSを選択し、「次へ」を押下する。
⑪「サイト設定」画面が表示される。ロードバランサは使用しないを選択し、「次へ」を押下する。
⑫ポリシーエージェントのパスワードを入力し、「次へ」を押下する。

⑬設定の概要画面が表示される。「設定の作成」を押下し、OpenAMのインストールが開始される。

⑭「設定が完了しました」画面が表示される。「http://openam.yasuyasu.com:28080/openam/UI/Login」にアクセスし、管理コンソールにログインできることを確認する。

2011年11月28日月曜日

OpenID  SAMLとの違い

OpenIDとSAMLとの違いについてまとめる。

【参照URL】
http://identitymeme.org/doc/draft-hodges-saml-openid-compare.html

上記の資料に丁寧にまとめられているが、今理解している範囲でまとめると、ポイントは以下になる。
  1. SAML仕様は、運用前に、信頼関係(トラストサークル)を構築する必要がある(SPとIdP間でのメタデータの交換、証明書の交換)。OpenID仕様では、信頼関係を構築する必要がない。どのRPもOPと認証連携できることが原則。なお、OpenID仕様では、OpenIDのプロトコルの中で、OPのエンドポイントURLのディスカバリ、共有鍵の交換を実施している。
  2. 1により、PKI基盤を用いているSAML仕様のほうが、セキュリティ強度が高いと思われる。
  3. SAML仕様では、アサーションという認証情報(XML形式)を規定している。OpenID仕様は、アサーションという形では規定されておらず、キーと値のペアで認証情報をOPとRP間で交換する。
  4. 3により、XML形式で認証情報をやりとりするSAML仕様より、OpenID仕様のほうが処理が軽い(レストフル)と思われる。
  5. SAML仕様は、認証プロトコルのほかに、ユーザの属性情報および認可情報のプロトコルを定義している。OpenID仕様では、認証プロトコル、ユーザの属性情報の交換(CX)を定義しており、認可情報のプロトコルは定義していない。そういう意味で、SAML仕様のほうが、定義範囲が広い。
  6. SAML仕様では、IdPとSP間で仮名IDを使用し、ID連携している(transient/persistent)。一方、OpenID仕様では、グローバルなOpenID(URL)で認証連携している(そもそもID連携していない)。
上記から、高いセキュリティ要件が求められ、かつガチガチに使用するWebサービスの範囲が決まっているお客様に関してはSAML仕様を採用し、mixiやfacebookなどOpenなWebサービス間の認証連携が求められる際にはOpenID仕様を採用して、仕様の使い分けが重要であると考える。

2011年11月24日木曜日

OAuthを勉強する

OAuthは、認証プロトコルではなく、認可情報をやりとりするプロトコルということが分かった。

今の頭の中のイメージは、以下である。

■SAML仕様(認証)
   IdPとSP間で信頼関係を構築し(トラストサークル)、限られた範囲でシングルサインオンする。

■OpenID仕様(認証)
OPとRP間で信頼関係を構築する必要はなく、SAML仕様と比べてよりオープンにシングルサインオンする。

■Liberty ID-WSF仕様(個人情報のやりとり)
Webサービス間で、ユーザの同意を求めながら、個人情報を取得、変更する。

■OAuth仕様(認可)
ConsumerとSP間で、ユーザの同意を求めながら、認可情報を交換し、あるWebサービスが他のWebサービスを使用できるようにする。


2011年11月23日水曜日

Tomcat 6(Windows X64版) Filter機能を使ってみる

Filter機能を使用し、クライアント証明書を検証します。
今回は、クライアント証明書のSubjectNameのCN属性をチェックし、web.xmlの初期パラメタとマッチした値であれば認証OKとします。
また、web.xmlの<filter>要素には、初期パラメタusernameを定義し、認証を許可するCN値を指定します。
なお、Filterを実装するためには、servlet-api.jarを開発環境のビルドパスに設定する必要があります。

①Filterの実装クラスを作成します。ポイントは以下です。
・javax.servlet.Filterインタフェースを継承する必要があります。
・destroy,init,doFilterメソッドは必ず実装する必要があります。
以下は、今回実装したdoFilterメソッドのソースになります。
@Override
public void doFilter(ServletRequest request, ServletResponse response,
FilterChain chain) throws IOException, ServletException {

// 初期パラメタの読み込み
String user = config.getInitParameter("username");

if( user == null) {
// エラー処理
throw new ServletException("認証対象のユーザが指定されていません。");
}

log.info("Config User Name=" + user);

// 証明書の取得
X509Certificate certs[] = (X509Certificate[]) request
.getAttribute("javax.servlet.request.X509Certificate");
if (certs == null || certs.length != 1) {
// エラー処理
throw new ServletException("クライアント証明書が指定されていません。");
}
else{
// CNの取得
Principal principal = certs[0].getSubjectDN();
X500Name name = new X500Name(principal.getName());
String cn = name.getCommonName();

log.info("Certificate CN=" + cn);

if(user.equals(cn) == false){
throw new ServletException("認証に失敗しました。");
}
}
// 後のチェーンに渡す
chain.doFilter(request, response);
}


②JAVAクラスを作成したら、JARファイルを作成します。作成したJARをC:\Program Files\Apache Software Foundation\Tomcat 6.0\libに格納します。

③web.xmlに以下のFilter要素を定義します。
-----------------------
  <filter>
    <filter-name>certificatefilter</filter-name>
    <filter-class>com.yasuyasu.filter.cert.CertificateFilter</filter-class>
    <init-param>
        <param-name>username</param-name>
        <param-value>clientuser.yasuyasu.com</param-value>
    </init-param>
  </filter>
  <filter-mapping>
    <filter-name>certificatefilter</filter-name>
    <url-pattern>/*</url-pattern>
  </filter-mapping>
----------------------

④Tomcatを再起動します。

⑤https://localhost:8443/sampleappにアクセスできることを確認します。
コンテナログには、以下が出力されており、実装したFilterクラスが呼ばれていることを確認できました。
---------------------------------------------------------------
2011/11/23 22:11:36 com.yasuyasu.filter.cert.CertificateFilter doFilter
情報: Config User Name=clientuser.yasuyasu.com
2011/11/23 22:11:36 com.yasuyasu.filter.cert.CertificateFilter doFilter
情報: Certificate CN=clientuser.yasuyasu.com
---------------------------------------------------------------

ちなみに、認証に失敗した場合、以下のエラーコード500の画面が表示されます。